Kivy Project. Part 1. Setting up environment
Posted on Wed, 01 Jun 2016 in Python
Kivy is an interesting project that allows you build GUI applications for different platform including iOS and Android. If you believe the rumors... I decided to check out is Kivy suits to build for small python GUI app for 5 major platforms: Mac OS X, Linux, Windows, iOS, and Android. In this series I'll try to build a small app for learning foreign language vocabulary and deploy it on all these platforms.
This series woun't be a tutorial. It'll be more like a log of my tries and failures. I'll cover very basic things. No street magic. If everything goes as I expect, at the end I'll get 3 or 4 executables.
NB: I use primary Mac for development. That's why most instruction will be for that platform. May be later I'll add instructions for Linux and Windows.
Set up Kivy
There are two ways to set up Kivy on Mac. You can download and setup bundle from homebrew. Or you can install Kivy from PyPi.
First way (fastest):
- Download from http://kivy.org/#download Kivy2.7z (if you prefer Python 2.7) or Kivy3.7z (includes Python 3.5)
- Extract it
- Copy file to Application
sudo mv Kivy3.app /Applications/Kivy.app
- Make symlink
ln -s /Applications/Kivy.app/Contents/Resources/script /usr/local/bin/kivy
This approach has a disadvantage. Kivy.app contains only one virtualenv for all projects. It's OK for small, simple projects, but it can cause problems for big ones. That's why I suppose to install framework in a separate environment for each project.
Second way (the rith one):
I assume that you use pyenv and pyenv-virtualenv.
Install dependencies first.
brew install sdl2 sdl2_image sdl2_ttf sdl2_mixer gstreamer
Install latest Python.
pyenv install 3.5.1
Some times it fails:
zipimport.ZipImportError: can't decompress data; zlib not available
In that case this command helps:
xcode-select --install
As soon as we get python installed, make virtualenv for our project.
pyenv virtualenv 3.5.1 WordConstructor
Activate it.
pyenv activate WordConstructor
Install Cython inside virtualenv.
pip install -I Cython==0.23
Install Kivy.
USE_OSX_FRAMEWORKS=0 pip install kivy
Let's check that everything is working. Open new file main.py in the project folder. Fill it with that content:
from kivy.app import App
from kivy.uix.widget import Widget

class WordConstructorGame(Widget):
    pass


class WordConstructorApp(App):
    def build(self):
        return WordConstructorGame()


if __name__ == '__main__':
    WordConstructorApp().run()
Save and run it.
python main.py
If a window with title "WordConstructor" appeared, everything works OK.
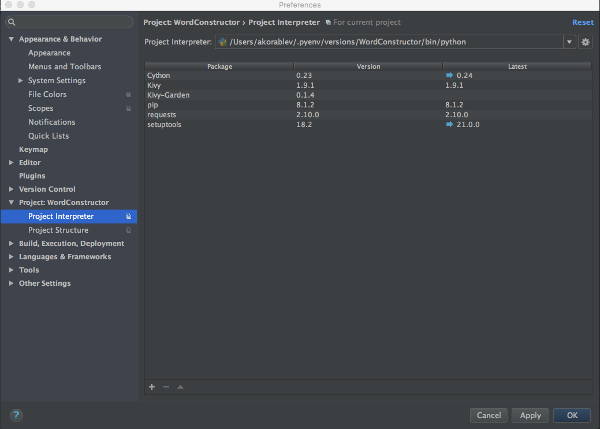
Tuning PyCharm
Let's set up PyCharm project.
In the Preferences dialog, choose Project interpreter corresponds our virtualenv.
Kivy uses Kv Design Language to describe UI. It would be nice to have syntax highlight and autocomplit for it.
- Download https://github.com/Zen-CODE/kivybits/blob/master/IDE/PyCharm_kv_completion.jar?raw=true
- Import it in menu File -> Import Settings in PyCharm.
- Check File types on and press OK.
- Restart PyCharm. Done.
That's all about setting up the environment for Kivy. Second part will cover more practical topics.
Got a question? Hit me on Twitter: avkorablev